Fast and Realistic 3D Paper Highlighter Animation in Adobe After Effects 2021
Important or special details are meant to be highlighted or placed in bold print. If this is the case, then it only makes perfect sense that a super cool highlighter animation exist for our creative use! In today’s blog, we are doing an overview of the 3D Paper Highlighter Animation that you can achieve in Adobe After Effects; no plugins necessary! Essentially, you will be able to take sample text from a book or desired document: scale up the resolution, add paper texture, create a highlighted mask & animate, and then add some 3d motion to tie it all together. Sounds like quite a bit of work, yes? Well, thanks to Adobe After Effects you can learn to master the art of Highlight Animation in just a few minutes.
Read on to check out the overview of this awesome animation. You’ll find a timecode for each step so you can watch the tutorial at that specific timecode (if you prefer a visual)
Step 1. Page Setup (1:13)
To begin, you will open up a new composition in After Effects. Be sure that you are set up for 1920 x 1080. Next, drop your “book page” file into the composition. Use quick button “S” to Scale the size of your paper to fit the frame.

To add an older paper look, import a paper texture that you’ve downloaded from resources such as Envato Elements and drag it down to your comp. Place the paper texture above the book page layer, and scale the paper texture to fit the frame.
Now you will need to make some mode adjustments:
If you don’t see “Mode”, right click the column and select “Columns”. From there, change the Mode for Paper Texture layer to “Multiply”. Doing this will bring your book page on top of the paper texture.

Step 2. The Highlighter Effect (2:36)
To create a highlighter stroke effect, we will need to first create a Solid. Go to Layer > New > Solid.
As the pop up window appears, you can choose the color of your highlighter. Next you will go to Effects and search for “Stroke Effect”. Apply that stroke effect to the solid. Turn off the solid layer from view but keep that layer selected as you will create a mask for it next.
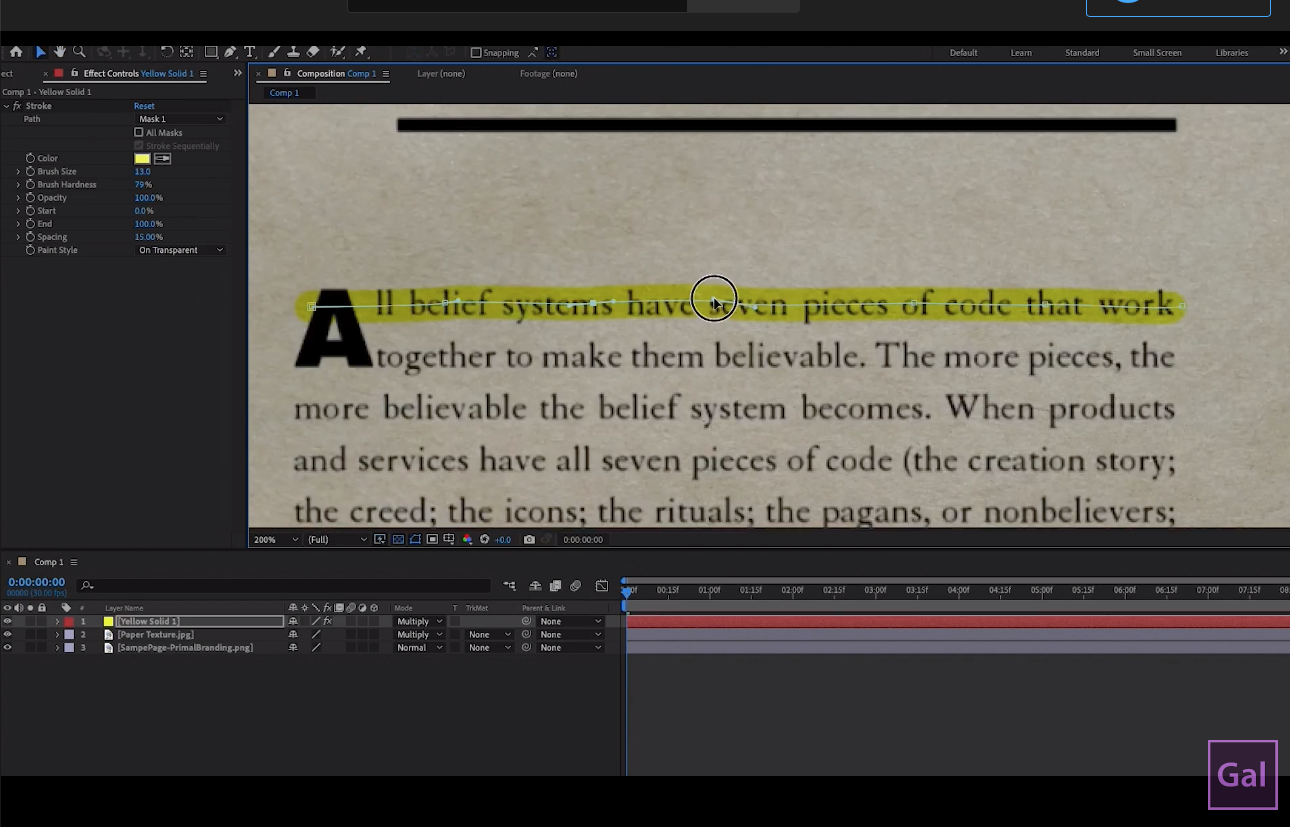
To create the mask, first zoom in a bit, then go up to the pen tool and begin to draw over the text that you want to highlight. You may want to refrain from drawing a straight line here so it contains some imperfection. In doing this, the work will have a more human element.
Click to start your line and then during your next line segment points, you’ll want to hold so you can adjust your line to curve a little for a more random line look. To preview, turn the solid layer back on by clicking the “eye” icon and then go to effect controls from the path. Choose “Mask 1” and change the paint style to transparent. You can scale up the brush size to the thickness of the line so your highlighter is covering the full size of your text.
Now change the blend mode of the solid to multiply so you can see the text beneath the highlighter as well as on the texture.To make adjustments to the mask, select the yellow solid and make adjustments to the mask path if you like.
Step 3. Stroke Animation (4:33)
To animate, move the playhead to the beginning of the comp, then go to the effect controls and from the end parameter, lower the percentage to zero. Then press the stop watch next to “End” to enable keyframe animation. Move the Playhead forward one second or so to when you want the animation to complete. You can always go back and adjust this later on. From here you're going to type 100 in the “End” parameter so the animation will be complete. When you play it back, you'll see that the highlighter animates in.
If you want to highlight the next line, you don't need to repeat this whole process!
Just go to the pen tool and quickly draw the mask over the second line. Next go from yellow solid to effect controls and check the box next to “All Masks”. It’s also super important that you select the box “Stroke Sequentially”. As soon as that’s done you can play back and see that all of the masks are animating one after the other sequentially. Use the shortcut button “H” to utilize your hand tool so you can move down to the next section that you want to highlight. From the yellow solid layer, duplicate it by pressing CMD+D on a Mac or control D on a PC with the layer selected, press enter to rename it so you don’t get the solid layers mixed up.

Within your duplicate solid layer, delete the two former masks and then use the pen tool to draw a new mask over the new lines that you want to highlight. Go back to comp and select your second solid layer, and repeat for however many lines that you want. And just like before, you'll see that each mask has its own color.
Upon playback you’ll notice that your multiple highlighted sections happen at the same time. This is because the animation is set exactly the same. What if you don't want the animation
to start at the same time? Easy fix! Stagger the layers! To do this, select both of the layers and press shortcut key “E” to bring up the stroke effect; here you can see the keyframes better. Now, drag the Section 2 comp layer to the right so that the animation starts after the top section is finished; adjust until the timing is to your liking. Note that you can also adjust the placement of the keyframes to allow for a slower highlight effect if your highlighted text is longer.
STEP 4. 3D Camera Movement (7:22)
Select all four layers in our comp by holding down shift and then right click and select Precompose. In the pop up menu, you will title your precomp layer. To make the precomp layer 3D, select the box under the “cube” icon and open up the transform parameters.
You can grab the X orientation in program monitor and move it down to give a more in a flat perspective. Now you will need to make a camera layer. To do that, go to the menu at the top of After Effects and select: Layer > New camera and choose a 35 millimeter lens, then click OK. Go over to the program monitor and press C on your keyboard to bring up the camera rotation. Here you can just click and move the camera's rotation anywhere to change the perspective.
If you press C again, you can move the camera's position by clicking and dragging,
If you press C again, you can get the camera zoom controls so you can click and push forward to zoom in until you fill up the screen.
Pressing C again will get you back to the rotation so you can make any further adjustments to the perspective if needed.
Think of the “C” key as a toggle tool where you can quickly go through and change the camera's position, rotation and zoom.
The next step will be to open up the camera transform tools and press the stop watch next to point of interest and position of the camera so you can begin animation. Once you’ve done this, scrub forward to the point where you want the animation to end and from the comp window you can then move the camera using the C keys.

You can play around with the Camera shortcut “C” key controls until it looks just right. Feel free to playback so you can preview the nice movement that you’ve created. If you want to make a quick change, just place your playhead at the end keyframes and use the C key to make your adjustments. To make the keyframes end more smoothly you can select both of the keyframes at the end of the animation and right click, then select easy ease. When you play it back, you’ll notice a smoother end to the animation instead of a jolted stop to the animation.
Optional: You can add a Lens blur by enabling the Camera’s depth of field. To learn how to do this watch starting at 9:57 in tutorial.
Step 5. Sound Design (11:23)
At this point you’re ready to export your work into Premiere Pro for some cool sound design. With your video file ready go in Premiere Pro, import a music track and some highlighter marker sound effects that you feel matches your video.
Align the sounds to the visuals by dragging and layering them in your timeline. When ready, lasso or simultaneously select all sound effects and hop on over to the Essential sound panel. From Essential sound, choose the Sound Effects option and click Auto Match so you can make sure that all sound effects are at the correct level. Playback your video with sound and make adjustments as needed to sound effects or music track.

Hopefully this fine overview has been the highlight of your day! When you visit our Premiere Gal YouTube channel, don’t forget to subscribe so you can receive notifications when the latest video is up!
As always, stay safe & keep creating better video with Gal.