5 Tips on Editing a Promotional Video

I was asked by two wonderful wedding photographers to shoot a promotional video for their business Chris & Alina Photography. And where do you go in winter when you still want footage of stunning landscapes? You go to Iceland.
Since I’m mostly filming and editing the same project, I film with the mindset of an editor and edit knowing the story behind each shot. For this project the constraints were: show beautiful landscapes, show how they work, make it authentic.
I shot on a Sony Alpha a99 with a 24-70mm/2.8 Zeiss lens. Adobe has always been my preferred choice for video editing because all the applications work so well with each other. This video was edited in Premiere Pro and After Effects. And this is how I did it:
1. Music First, Edit Second

Adds markers to the music track to indicate where a beat takes place. This will make it easier to edit to the beat.
Before I start editing, I look for music that fits the story, mood and pacing. It’s so much easier to edit when the music is already there. I can put strong images to the climax of a song to emphasize the story; music and image just work so much better hand in hand. A lot of websites like Audio Network, Premium Beat, De Wolfe Music, Music Bed or Audio Jungle offer millions of songs and licenses.
When editing to music, I like to match the cuts to the beat of the song. There are plugins like BeatEdit that automatically detect the beat for you inside of Premiere. If there’s no plugin, the easiest way to make the beats visible is to play the song in the timeline and place a marker to every beat by hitting M. So I can quickly see when to cut and how long the cuts should be if they should match the beat.
2. Adding Effects in After Effects with Dynamic Link
The thing with Dynamic Linking is that depending on what kind of crazy stuff you did in After Effects, the preview often doesn’t play smoothly in Premiere unless you prerender it which can eat up a lot of time. So thankfully in Premiere I can actually prerender a single clip to get rid of this problem by right clicking on the clip and using the “render and replace” function. This function is undoable in case you want to go back into AE and make changes.

3. Adding Slow Motion
In some scenes I’m use time remapping in After Effects. I create a Dynamic Link to import the clip into an After Effects composition. With time remapping I stretch the clip out to produce a nice slow motion effect. But since the footage was shot with only 25fps, there’s now some stuttering because there just aren’t enough frames. This is where frame blending mode comes to the rescue! Frame blending has an advanced mode called Pixel Motion which makes the transition between the frames smoother, and the footage plays more fluidly.

4. Refining the Edit: Learning to Let Go
Often the hardest part of editing is getting rid of footage that is beautiful. Especially when you were also filming it and have a closer connection to the footage and the story around it. But if you don’t make some cuts, your video will be too long, and people don’t want watch all of it (unless you have Ryan Gosling in it, then leave it in. All of it). But it’s good to kill your darlings every now and then. Not all of them of course because you still wanna show the good stuff. But be brave and let shots go that don’t add to the story. Ask yourself, does the story work without a specific shot? Then you don’t necessarily need it.
5. Color Correction and Color Grading
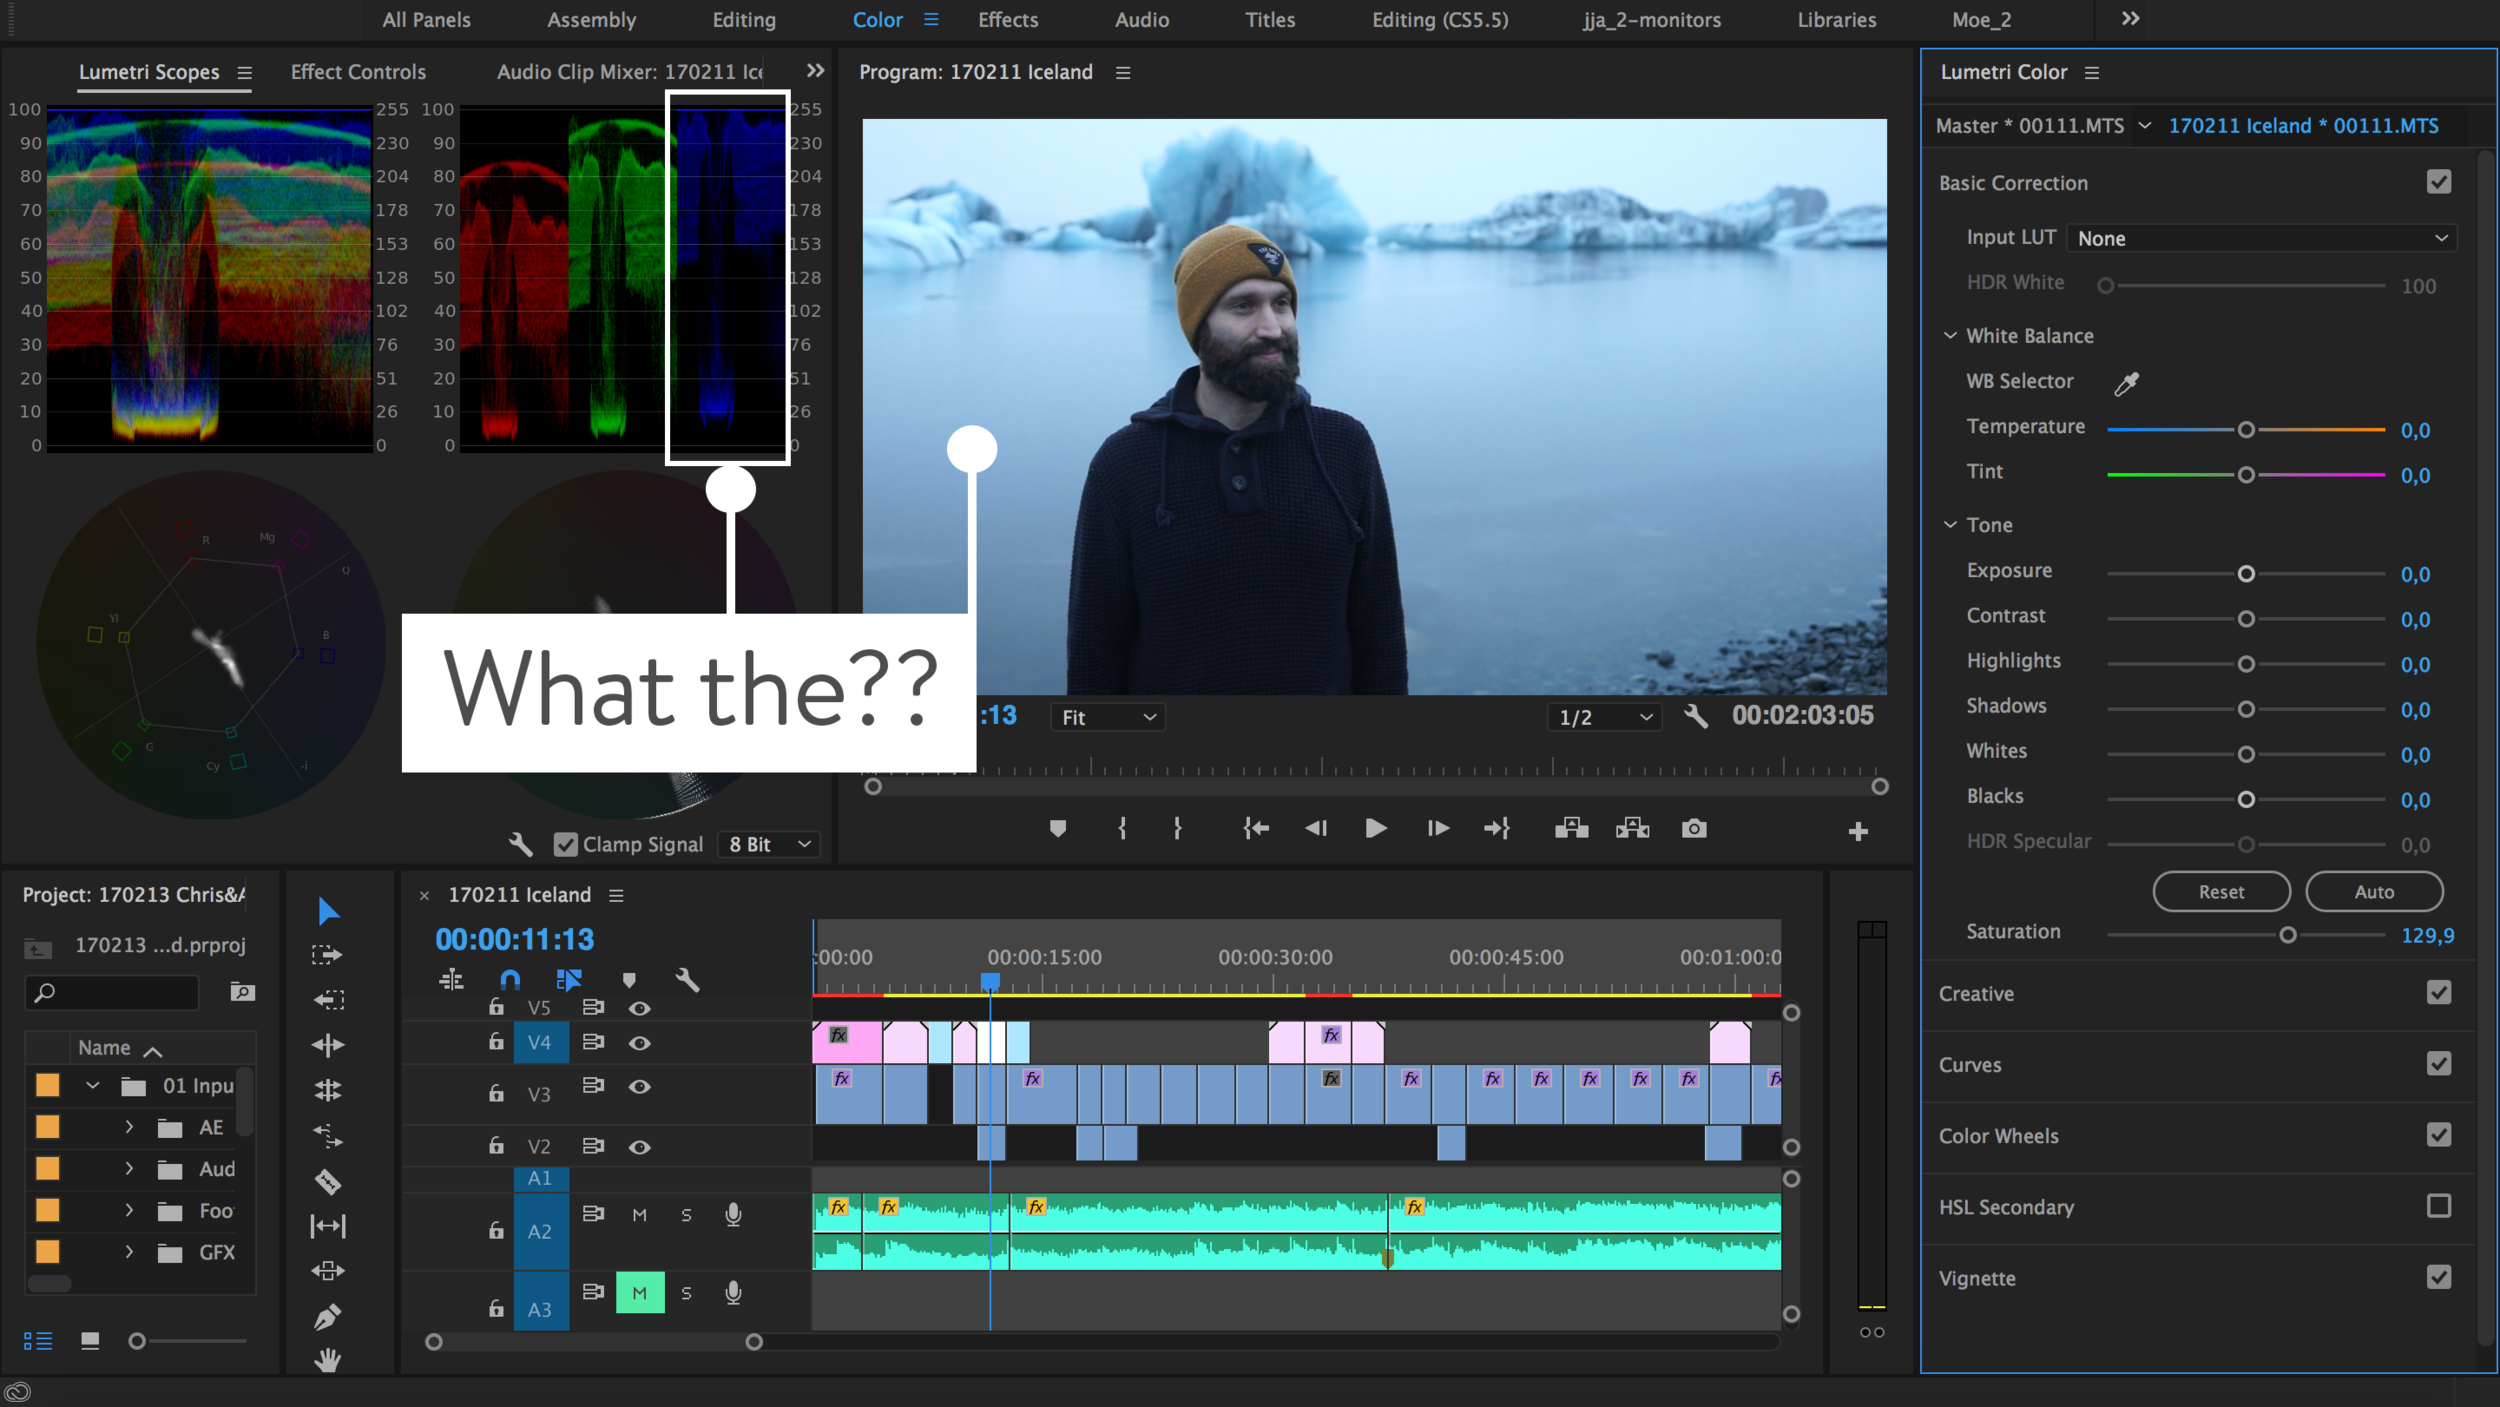
Once I’m done with the main edit and I have a locked picture, I go into color grading to fix things and give everything a consistent look. Premiere’s Lumetri Panel is my favourite tool to do so. Probably the most important tools in Lumetri are the scopes. With just looking at the scopes you can tell if the colors and luminance of a shot are correct and you can fix things simply by reading the scopes correctly and not looking at the image itself.
For example, the Vectorscope YUV tells you if the color of the skin is about right. There’s a diagonal line on the right left between the Yellow and the Red point, it’s called the Skin Tone Line. Our skin color is basically the blood circulating underneath our skin. Blood has always the same color, and the Skin Tone Line represents the red under our skin, no matter the ethnicity of the person in the shot. So the closer the skin tone appears to this line, the more accurate is the skin color of your footage. Phil Collins’ “I see your true colors shining through” never felt more accurate.

Lumetri is also very powerful in fixing white balance or giving your footage a specific look.
Here’s a shot where I failed miserably at adjusting the white balance while filming. Everything is too blue which you can see in the scopes: the blue is way over the top.
The quickest way to fix that is to go into the Basic Correction tab and select a point with the color picker that’s supposed to be white in the shot. Temperature and tint will automatically adjust. The scopes look much better now, but I want the red, green and blue to be at the same level, so I finetune manually until that’s done.

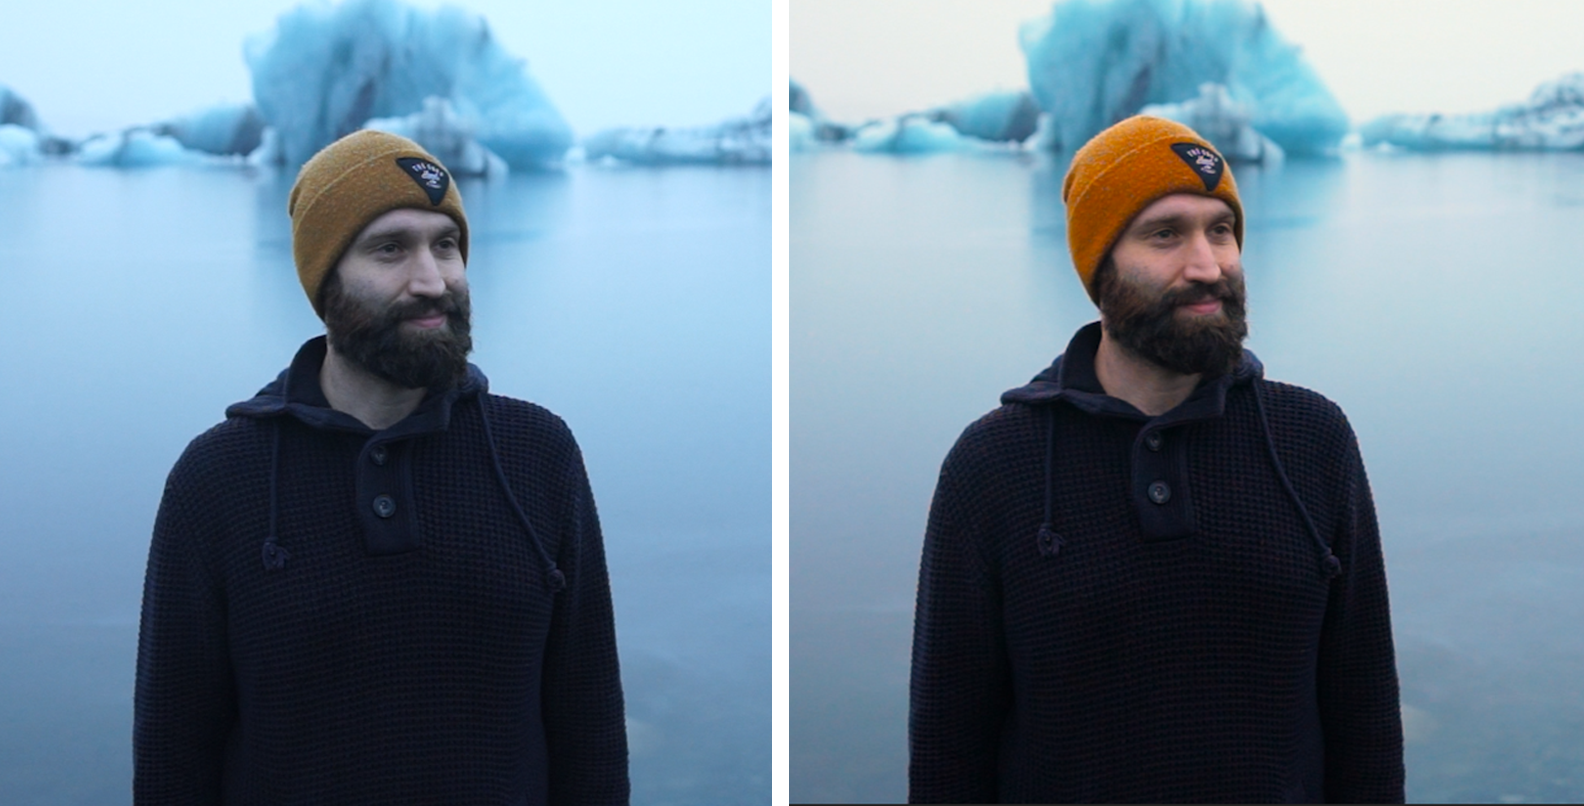
The other settings in the Basic Correction tab are helpful to adjust the image as you like it, raise or lower the exposure, tweak the contrast, etc. In this shot I added a bit of contrast to bring the color out more, made the shadows brighter and the blacks a bit darker. This way the image doesn’t get too dark but I still achieve a nice contrast between the clear bright ice lake and his dark hoodie.

Now I want the orange of his beanie be more saturated to make him stand out from the background more. One way to do so is to raise the amount of orange in the Hue Saturation Curves. The curves allow to lower or raise the saturation of one specific color range and not the whole image.

Another way to adjust one specific color is go to into HSL Secondary. With the color picker I choose the color I want to work on. By activating the Color/Gray box, I can solo the color that I have picked and refine the edges of the beanie with using the H, S, and L bars as well as Denoise and Blur. This ensures that I get as much as I can out of the beanie.

Now I can do whatever I want with the color. I could even swap the color and make the beanie blue. (But he’s wearing it in a lot of shots, and I don’t really wanna go down that road.)
So this is the before and after, just with the help of a few quick fixes in Lumetri.
Kerstin Ebert is a videographer from Hamburg, Germany, and has been filming and editing TV commercials, promotional videos, user stories, and other formats for a few years now. Telling wonderful and inspiring stories with videos is what she loves to do the most. After that comes chocolate, cheese, and music, the order may vary.
Take a look at her portfolio, drop me her a line, or stalk her professionally on LinkedIn.